TRAINMASTER BY WERNER MEER  US-RAILROAD-SHOP KILCHBERG
HOCHWEIDSTRASSE 3  CH-8802 KILCHBERG (ZÜRICH) SWITZERLAND (founded 1977)
PHONE *41-44-715-3666, FAX *41-44-715-3660, E-MAIL trainmaster@bluewin.ch
Go back to our Website - click here

added: March 29, 2022

Cajon Pass Photo Collection
June 17, 1986
by Werner Meer, Switzerland

Note: The copyright belongs to this gentleman. Do not use any photos without written permission.

Back in 1986 digital photography did not exist. Therefore, a good friend of mine took the time to scan my old negatives. A big thank you goes to Marc Rossire. Well, colors and quality are sometimes not the best but on the other hand, I can show what happend back in the old days in and around Cajon Pass.
This trip, my Swiss friend Ruedi Mueller came along.

For bigger size photos - please click on the 3- or 4-digit number below each photo.

To get a better idea about these locations you can find 2 aerial photos (wich I took in May 2010) with captions by Gary Gray.
Alray - Baldy Mesa Road MP 59.5X (former Tunnel 2)  -  197-1 Former Tunnel 1 (all 4 tracks visible)  -  197-2


Part 1: Alray area - Tunnel 1 and 2 which have been built in 1913.
Well, during the time we spent around the tunnels there was not any train coming (bad luck).
WM-01 - Tunnel 2 West Portal WM-02 - We are inside Tunnel 2 and looking thru the West Portal
WM-03 - Tunnel 2 East Portal WM-04 - Ruedi Mueller in front of the East Portal
WM-05 - Tunnel 1 West Portal WM-06 - Tunnel 1 West Portal
WM-07 - Tunnel 1 West Portal WM-08 - Tunnel 2 East Portal
WM-09 - Tunnel 1 West Portal (left = UPT) looking East WM-10 - Tunnel 2 East Portal (above UPT) looking West
WM-11 - Tunnel 1 West Portal WM-12 - Tunnel 2 East Portal
WM-13 - looking East (toward Hill 582) WM-14 - from above Tunnel 1 looking East
WM-15 - Ruedi Mueller high above the tunnel area WM-16 - Tunnel 2 East Portal


Map of Alray area (former Tunnel 1 and Tunnel 2) with captions by Gary Gray


Part 2: Mormon Rocks - Highway 138 - Pine Lodge
WM-17 - AT&SF EB w/Kodak U-Boat WM-18 - AT&SF EB DPU's with Caboose
WM-19 - same train going to Davis Ranch Road WM-20 - anothe AT&SF w/2 Kodak locos


Part 3: Silverwood - USFS 3N45 (MP 57.2)
WM-21 - in front is MT-3 (former South Track) and above North Track WM-22 - the Auto Racks are rolling over USFS 3N45 at MP 57.2
WM-23 - AT&SF DPU's behind a Caboose EB (uphill) WM-24 - same DPU's over the USFS 3N45
WM-25 - Amtrak Desert Wind WM-26 - Amtrak Desert Wind
WM-27 - Amtrak F40PH WM-28 - Amtrak Superliner
WM-29 - AT&SF 4-unit lashup w/manifest WM-30 - same train w/BN Hi-Cube Box Car
WM-31 - our rental car was a Oldsmobile Cutlass WM-32 - this little bridge is just for the water if there is heavy rain


Some photos were taken at one of these locations below (we usually mention the place of the photo):
Dagget, Barstow, Victorville/Narrows, Frost/Crossover, Hesperia, Lugo/Martinez, 
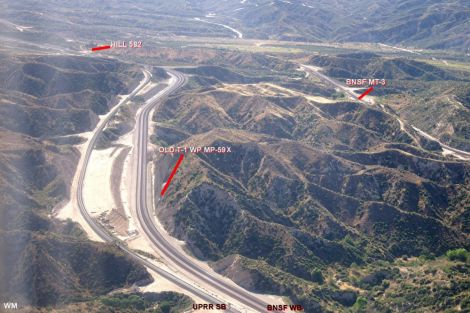
Summit, West Summit Island, Silverwood, Hill 582 Area, Alray/Tunnel Area, CP Walker/Davis Ranch Road, Mormon Rocks/Stein's Hill/Pine Lodge/HWY 138, Sullivan's Curve, Cajon Station/Junction, Swarthout Canyon Road Crossing, Blue Cut, Lower Canyon, San Bernardino,

Abbreviations found on this page: EB = East Bound, NB = North Bound, SB = South Bound, WB = West Bound,
MT-1 = BNSF Main Track 1, MT-2 = BNSF Main Track 2, MT-3 = BNSF Main Track 3, UPT = UP Colton-Palmdale Cutoff Track,
MP = Mile Post, DRR = Davis Ranch Road, DPU = Distributed Power Unit (Helpers), SC = Sullivan's Curve,  SWC = Swarthout Canyon Road Crossing, WSI = West Summit Island, KCR = Kemper Campbell Ranch

All photos copyright by Werner Meer

Go back to Cajon Pass Main Page - click here

Cajon Pass
Photo Collection
 May 1987
Sullivan's Curve, Tunnels, Stein's Hill
(Barstow & Tehachapi)

Photos by Werner Meer (Switzerland)


Updated: 4/02/22
1987 - SP Tunnel Motor WM-073 See all 218 photos - click here 1987 - AT&SF Kodak U-Boat WM-106


Cajon Pass
Photo Collection
 May 1989
Mormon Rocks, Sullivan's Curve
(Barstow & Tehachapi)

Photos by Werner Meer (Switzerland)


Updated: 4/07/22
1989 - SP EB over Cajon Creek WM-006 See all 194 photos - click here 1989 - UP WB Coal Tarin WM-036


Cajon Pass
Photo Collection
 April 1991
(Tehachapi, Mojave Desert)

Photos by Werner Meer (Switzerland)


Updated: 4/16/22
1991 - SF GP60M Cajon - 91-061 See all 267 photos - click here 1991 - SF at Sullivan's Curve - 91-031


Cajon Pass
Photo Collection
 May 1993
(Barstow)

Photos by Werner Meer (Switzerland)


Updated: 4/26/22
1993 - SF GP60M/GP60B Cajon 93-082 See all 125 photos - click here 1993 - UP WB w/CSX and Switchers 93-045


Cajon Pass
Photo Collection
 May 1995
(Barstow, Tehachapi)

Photos by Werner Meer (Switzerland)


Updated: 5/01/22
1995 - SF EB to Sullivan's Curve 95-035 See all 146 photos - click here 1995 - SF WB at Stein's Hill 95-019


New 7/19: Accurate Map of Cajon Pass as of 2018 by Steve Jessup & Todd Gillette (RR Illustrated) - click here
8 different and detailed Maps of Cajon Pass with captions (Mile Posts and Location) by Gary G. Gray - click here
New 8/11: Maps "How to find" Hill 582, Sullivan's Curve, Noisy Point by Gary G. Gray - click here
Accurate Map of Cajon Pass with 3rd Main Track by Michael Amrine - click here


Home Cajon Pass Photo Gallery California Photo Gallery HO Mojave Desert Layout

(over all copyright by Werner Meer, Switzerland - 2022)