|
|
TRAINMASTER
BY WERNER MEER US-RAILROAD-SHOP KILCHBERG |
|
|
|
TRAINMASTER
BY WERNER MEER US-RAILROAD-SHOP KILCHBERG |
|
added: 10/16 (Part 1, 2,
3) / updated: 2/19 (Part 4 & 5) /
updated: 1/20 (Part 6)
updated: 6/21
(Part 7)
/
updated: 1/22 (Part 8) / updated: 4/22 (Part 9 & 10)
updated: 10/25 (Part 18) - click here
First Section: Part 1 to Part 10
(Please note: We are now having 2 Sections of this Report)
| From a Diorama to a complete Layout - step by step ! |
| HO Scale: Sullivan's Curve by Bernard Frontanau (France) |
|
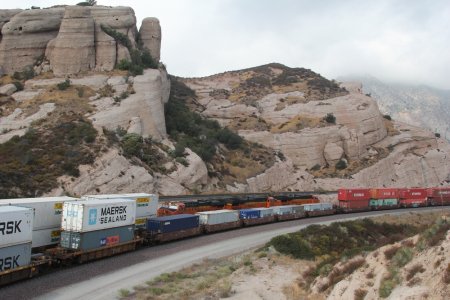
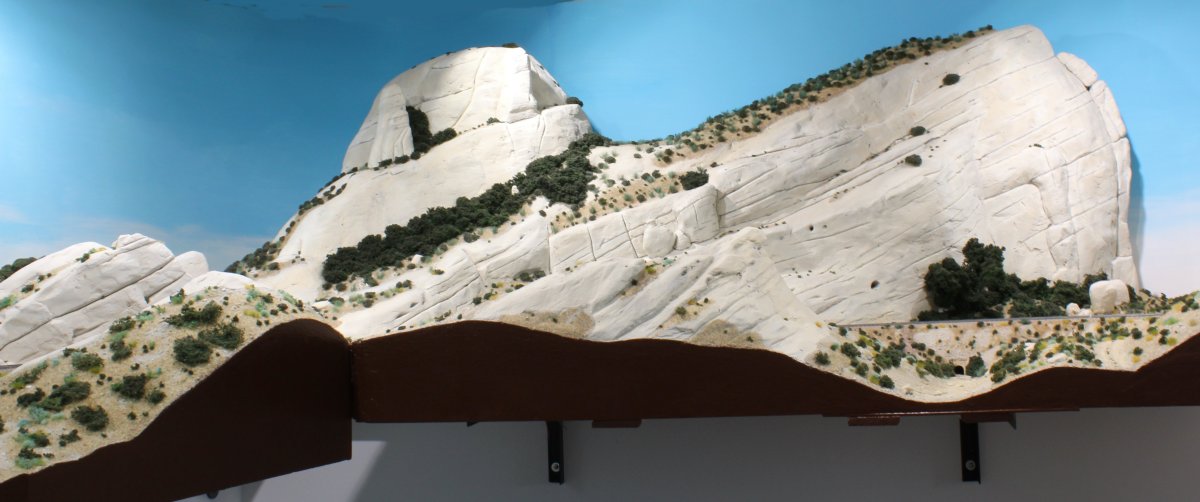
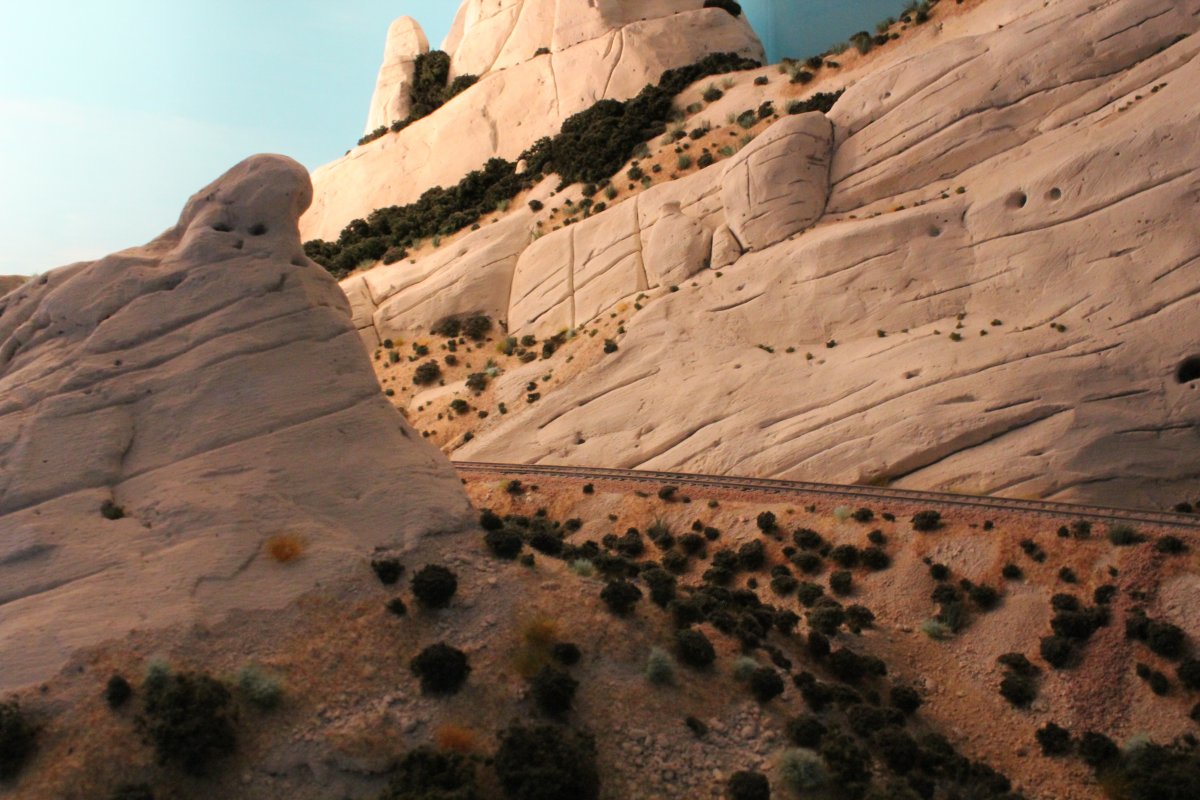
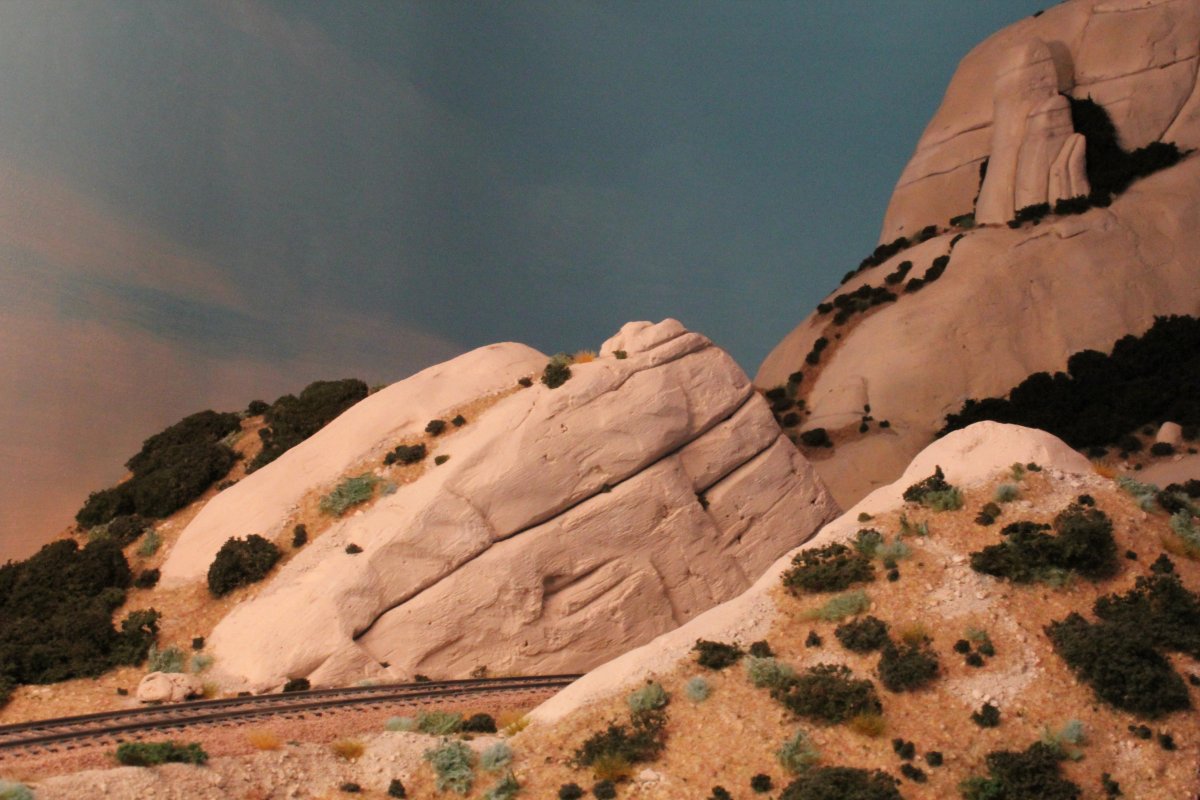
This outstanding Sullivan's Curve Diorama was built
back in 1992. The radius in the curve is 110 cm. It reflects the good old days before 1966 as Southern Pacific built their Colton - Palmdale cutoff. In other words, it is single track around the curve of Santa Fe with trackage rights of Union Pacific. Please read additional information at the end of this page - just scroll down! |
| Part 1 = finished Diorama / Part 2 = construction of the Diorama / Part 3 = the real Curve as it looks today |
|
Through the extensions of my Sullivan's Curve Diorama
on the West Side (Part 4) and on the East Side (Part 5), the time has come
to find a matching name to my expanding layout. Since it's a fictitious ATSF
(now BNSF) line situated somewhere in the southwest, I decided to name it:
the "BNSF DESERT AND SIERRA SUB", also known as
the "Southwest Scenic Route". A "could have been" Santa Fe subdivision that is also used by the Union Pacific which has trackage rights over the line. So I'll be able to run a variety of companies I like, Which are ATSF, BNSF, UP, SP, SSW, D&RGW, BN, and so on. It will be an "extended" modern period with interesting and colourfull lashups. Now I just have to name the different points of interest the trains will encounter on the BNSF DESERT AND SIERRA SUB. |
|
New 2/19: Part 4 = West side extension of Sullivan's Curve
/ Part 5 = East side extension of Sullivan's Curve New 1/20: Part 6 = Construction of the lower level / New 6/21: Part 7 = Extending the upper level to the west New 1/22: Part 8 = Extending west to the summit and beyond New 4/22: Part 9 = The helix and the upper return loop. Part 10: The East extension of the upper level. |
(for bigger size photos please click on 3- or 4-digit number under each photo)
| Part 1 = the finished diorama in 2016 | |
|
|
|
| Overview of famous rock formations named after photographer, Herb Sullivan - 7658 | |
 |
|
| 7661 | |
 |
|
| 7660 | |
 |
|
| 7659 | |
 |
|
| 7662 | |
 |
|
| 7664 | |
 |
 |
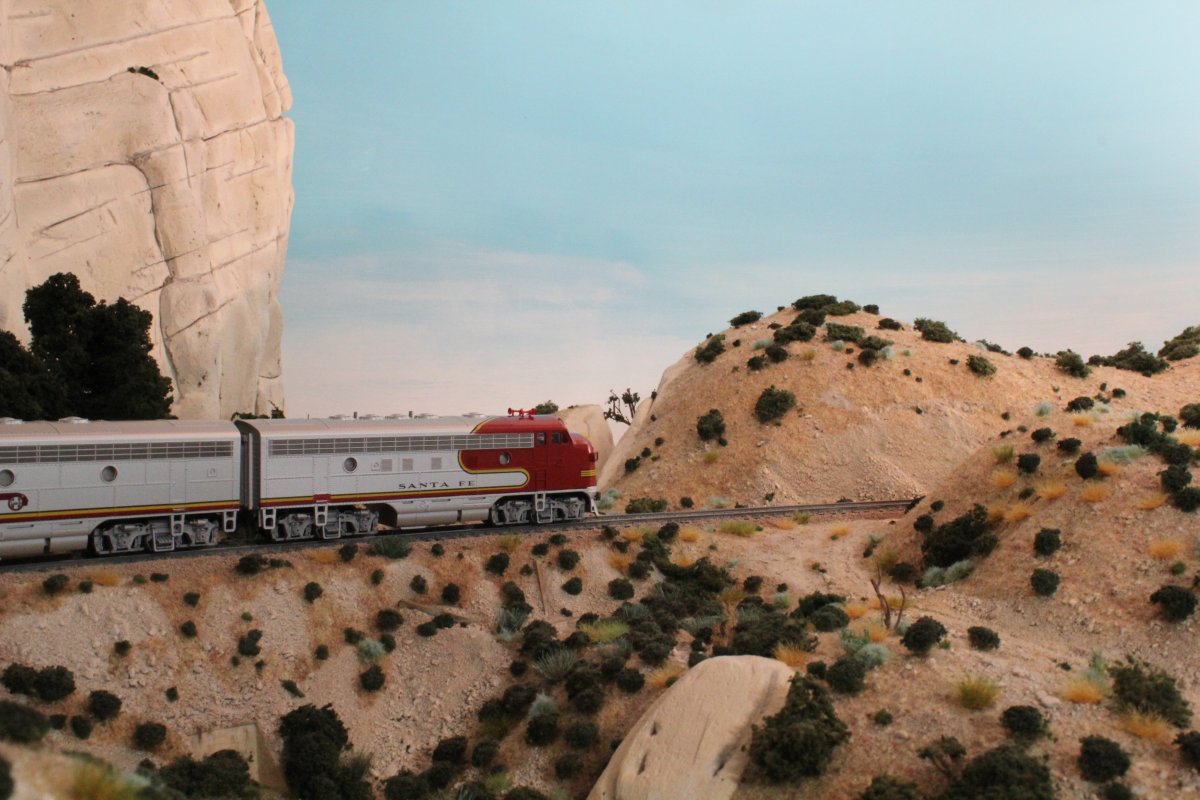
| a Santa Fe EB train is passing the curve - 7561 | very realistic landscaping (real or scale) - 7564 |
 |
 |
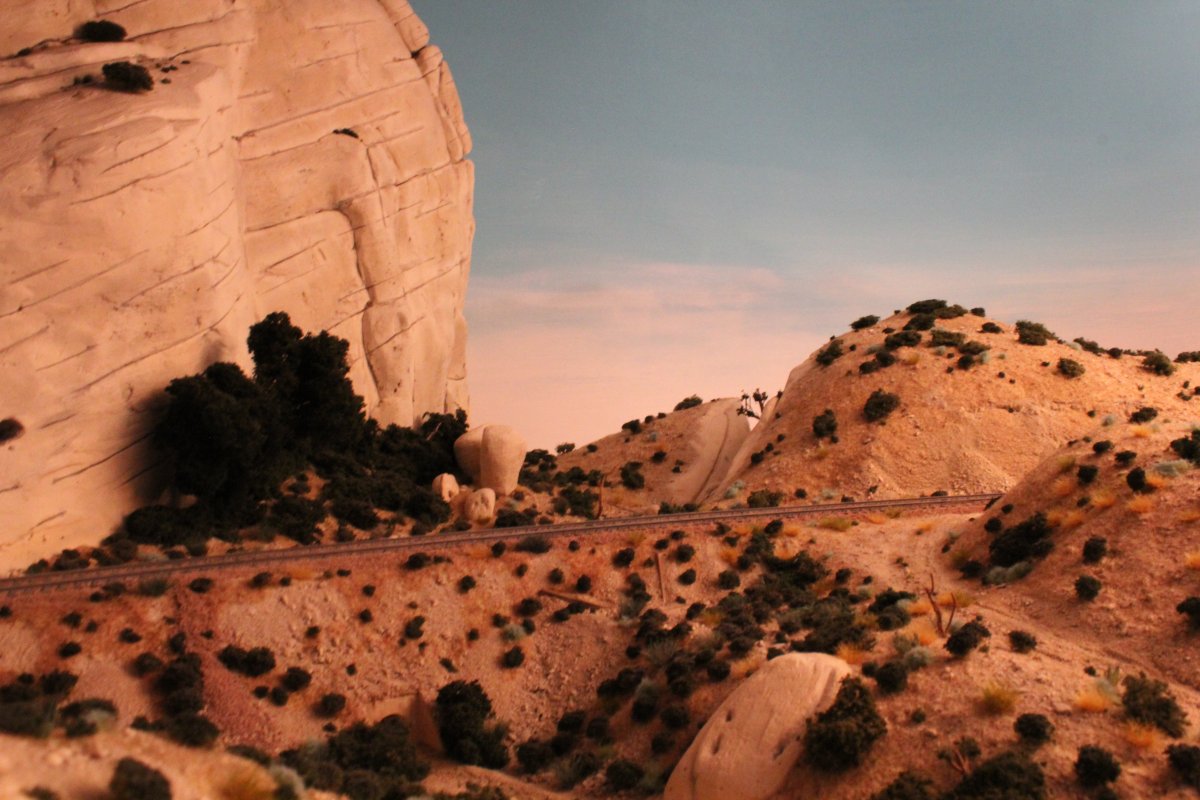
| dirt road for access to tracks - 5519 | 7540 |
 |
 |
| 7136 | 5514 |
 |
 |
| 7809 | 7771 |
 |
 |
| 7573 | 6931 |
 |
 |
| 7736 | 7765 |
 |
 |
| 7763 | 7532 |
 |
 |
| 8285 | 7734 |
Photos copyright by Bernard Frontanau
| We want to tell why this Sullivan's Curve model is having one track only compared to today. But Bernard built his Sullivan's Curve model before SP started to build their "new" line, as it was in the late 50's and early 60's. |
| AT&SF (Sante Fe) built in 1913 a track around the Sullivan's Rock formations to get a line to the Cajon Summit with just 2,2 % grade because their first (old) line has a 3 % grade. SP (Southern Pacific) built their Palmdale-Colton Cutoff in 1967. From that moment on we were having two tracks around the curve. But in 2008, BNSF built their 3rd track through Cajon and double tracked their 2,2 % track. In other words, we are having now 3 tracks in real life. |
|
HO
Scale: Sullivan's Curve by Bernard Frontanau (France) Convention presentations |
| This outstanding Sullivan's Curve Diorama was presented at the 8th Convention for American Railroadfans in Switzerland in October 1994. We were pleased as Bernard Frontanau presented his "one of a kind" masterpiece again at the 10th Jubilee Convention in 1998. Within these 4 years, it was completly detailed as you can see above. |
|
Part 2 - HO
Scale: Sullivan's Curve by Bernard Frontanau (France) - Part 2 The construction - how to do |
|
|
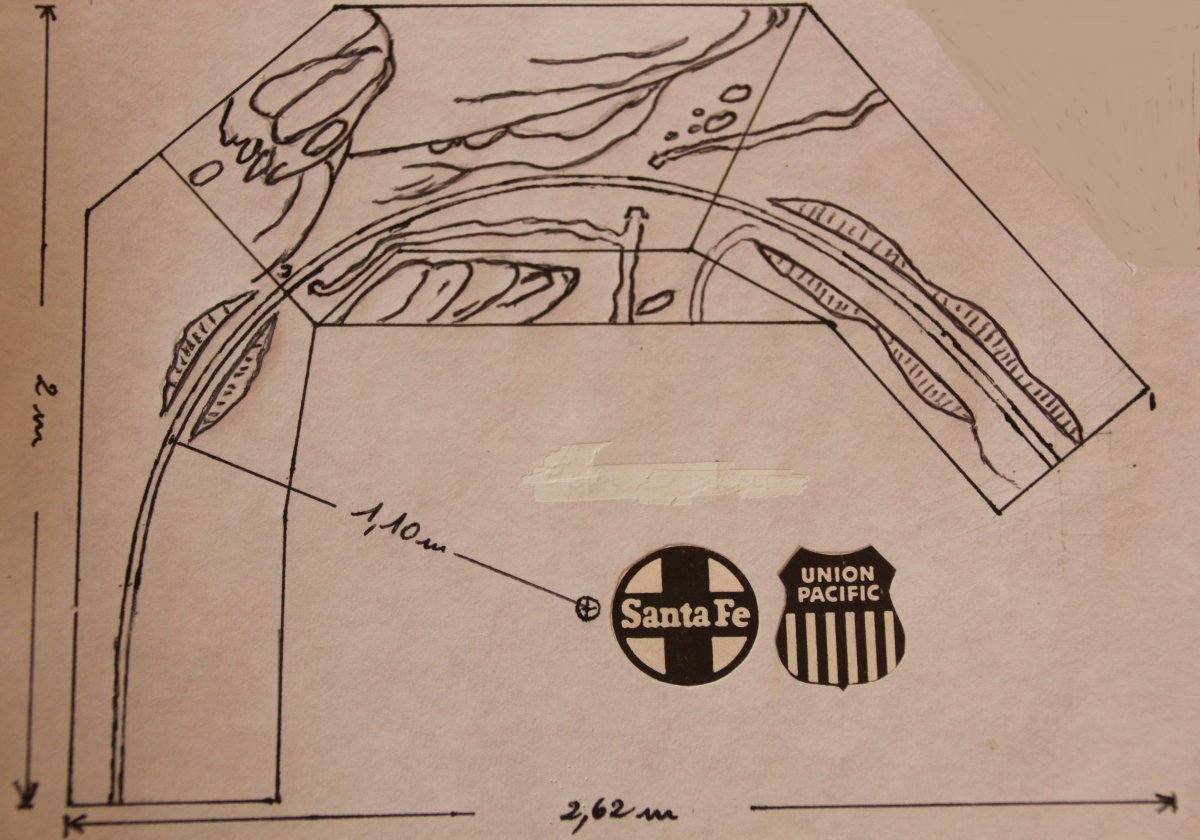
It all started with Herb Sullivan, and others' photos
in the late Chard Walker book, "Cajon, rail passage to the pacific". That led me to draw plans and sketches for my diorama. The original 10° curve translated to 195 cm radius in HO ! Using selective compression, I found a radius of 110 cm to be impressive enough. I built 4 portable modules to compose the diorama. |
|
 |
 |
| My first drawing of the curve. The center module holds the famous rock formations - 8310 | The foundation is an "open grid" of 2 x 4 cm. On top glued layers of styrofoam are roughly shaped to build the terrain contours. This is the main module. - 8312 |
 |
 |
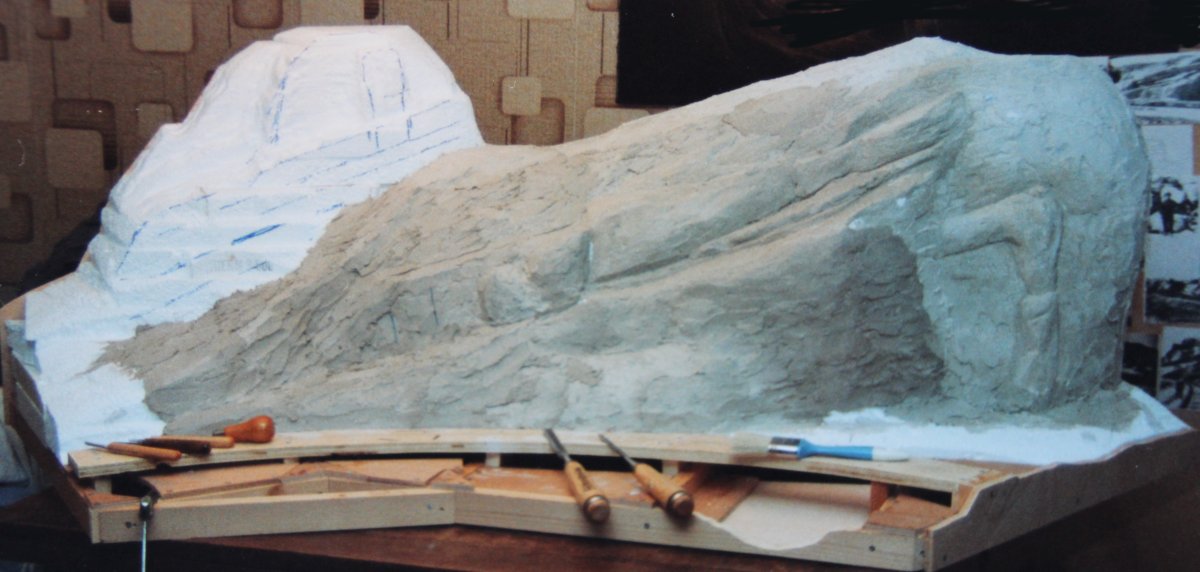
| Plaster carving is on its way. - 8313 | Plaster work done. - 8314 |
 |
 |
| Adding ground cover . . . . - 8316 | . . . . and vegetation. - 8319 |
 |
 |
| The main module is completed, still to come: track and ballast. - 8337 |
The wooden grid for the module west (left) of the main
one. - 8323 |
 |
 |
| Track support (18 mm plywood) and contours (10 mm plywood) added. - 8326 | Again the terrain is built with styrofoam and shaped with a wood rasp to match the wooden contours. In this case I used tough cardboard for the slopes, it could be made with styrofoam. - 8327 |
 |
 |
| Ground cover (different sizes of sifted sand) . . . - 8329 | . . . . and vegetation added. - 8332 |
 |
 |
| At the foreground the east (right) module is on its way. On the left the start of the small module that will support a rock formation is visible - 8333 | The small module almost done. - 8334 |
 |
 |
| Styrofoam stage of right module. - 8339 | Installing code 83 flextrack with progressive superelevation. - 8340 |
Photos copyright by Bernard Frontanau
| Part 3 - Sullivan's Curve - the real thing (2010 to 2014) - Part 3 | |
 |
|
| May 2010 taken from the air already with BNSF third Main Track in service by W. Meer | |
 |
|
| May 2010 We are standing near the UP Track incl. Canyon siding (below are BNSF tracks) by W. Meer | |
 |
|
| June 2011 from left: BNSF MT-2, MT-1 and above UP track w/Canyon siding by W. Meer | |
 |
|
| May 2013 The Rocks rest in piece as there is no train around by E. Hänseler | |
 |
|
| December 2014 BNSF EB Cristmas Train on BNSF MT-1 going uphill by G. Trüb | |
 |
|
| May 2013 as seen from the left side. Below BNSF MT-2, MT-1 and above UP track w/Canyon siding by E. Hänseler | |
 |
 |
| May 2012 UP SB on former SP track by M. Frei | May 2012 Two BNSF intermodal trains by M. Frei |
added: 2/19 (Part 4 & 5)
|
BNSF DESERT AND SIERRA SUB
Hereunder you'll find an introduction about my vision of my layout and informations about the "how" and "why". |
|
When I decided to install permanently my Sullivan's
Curve modules and use them as a starting point for the layout, I knew from
the beginning that I had no intention to build an HO model of the famous
Cajon Pass where the real Curve can be found. I cannot fill a room with the
same kind of scenery, I get bored very fast. I like scenery variety and the
challenge to blend everything logically to end up with a believable
miniature geology. These are the reasons that led me to build a model
railroad with freelance scenery and some "real" settings
shamelessly mixed
in. The "BNSF Desert and Sierra Sub" also called "Southwest Scenic Route", is a "could have been" ATSF, now BNSF line situated somewhere in the Southwest. Through trackage rights agreements the line is also used by UP trains. Ultimately it will be a double level layout which will figure the continuous mountain climb of a railroad from a small settlement in the desert, through spectacular canyons and desert scenery, and finally accessing to a high mountain pass in the sierra. The progressive transition from desert to high sierra scenery is my main goal. Westbound trains will appear at the lower level, will stop to add the necessary helpers, and will highball for the horrendous climb lying ahead. At summit the helpers will come off the trains and either go back downhill for their next assignment, or wait for especially heavy eastbound trains and help them with braking power on their descending run. The westbounds will then disappear from the scene. A hidden helix will connect both ends of the layout to provide continuous running and allowing for example full and empty coal trains to always run in the correct direction. Long trains at very slow speed fighting gravity and snaking through beautiful scenery is for me the ultimate thrill, eventhough there will be (very) little switching possibilities. Amtrak "Desert Chief " will provide both east and westbound passenger trains on the line. With just a few exceptions I add the modules only when they are completed except for the track. I like to work on sawhorses in order to have access from all sides during the building phases. Following a plan I drew on paper at a scale of 1 meter being 4 cm, I start with a 2 cm x 4 cm open grid, I then add a 10 mm thick plywood fascia cut to the terrain contours I wish to create. I put this fascia only on the aisle side of the modules since the rear isn't visible. I sometimes use 3 mm "Isorel" where a curved fascia is more convenient than an "angled" one. Subroadbed is 18 mm plywood. Minimum visible curve radius is 90 cm. I then fill up the grid with styrofoam to build up the terrain, and shape it with a rasp to match the fascia contours. I use normal building plaster over the foam to create the rock formations which are carved after the plaster has dried for about 24 h with chisels and other tools to obtain the desired effect. The final rock texture is given with the use of a wire brush. The groundcover is inexpensive sand and stones I sift in various sizes myself. It is spread over a layer of undiluted carpenter glue. After drying I wet everything with water in which I add a few drops of dishwashing detergent as wetting agent, this followed by a mix of 50/50 glue and water plus a few drops of the same detergent. After drying it is as hard as concrete. I color the plaster with watercolors applied with a brush and the groundcover with an airbrush. I use india ink mixed with water to darken some areas, and highlight rock faces and groundcover with drybrushing. Some rock formations are created with slabs of styrofoam I carved and then colored. This is a technique I wanted to try. I use thyme branches for the trees and different commercial products for grass, bushes, and foliage. Ocotillos are made with very fine copper wire. Yucca "flowers" are finely ground white styrofoam. Lightning is provided by 5 watts LED spots, I choose them with a colour temperature of 4000 kelvin and a 100° light angle. It isn't too white neither too yellow. Finally I would like to give a tip of the hat at Mr Lucien Wiss my friend and a great artist. He was a great inspiration and I learnt a lot watching him at work. - Bernard Frontanau |
(for bigger size photos please click on
3-digit number under each photo)
added: 2/19
|
Part 4: West of Sullivan's Curve by Bernard Frontanau (France) - Part 4 BNSF DESERT AND SIERRA SUB |
| Here are photos of the first diorama West of my Sullivan's curve. Photos of the building steps showing how I handled the scenery transition to be "geologically realistic". The grid is 2 x 4 cm, the track support is 18 mm plywood, and the fascia 10 mm plywood. |
X.jpg) |
X.jpg) |
| West end of sullivans' Curve module 025 | On this photo you'll notice the slight winding nature of the track support to get a more interesting effect. 031 |
X.jpg) |
X.jpg) |
| new part at left and old part at right 033 | Test fitting the module. Later I slightly cut down the highest part of the fascia. 035 |
X.jpg) |
X.jpg) |
| Here you can see part of an old diorama I built in the 80s. It was discarded but I saved a few pieces to be inserted in future projects. It is a small drywash with abutments and bridge. I had to cut out a portion of the subroadbed to make it fit. 037 | This is the plaster phase for a cut through a rock formation. 038 |
X.jpg) |
X.jpg) |
| This photo shows the now inserted dry wash. 043 | The expending scenery west of it with some hoodoos also called "the twin mushrooms" by the railroaders. 046 |
X.jpg) |
X.jpg) |
| On this photo you see how the lower rock strata matches those found at Sullivan's curve. The angle of the stratas helped me to build a logical scenery transition between the two dioramas. 064 | Slowly progressing scenery west of the dry wash. 068 |
X.jpg) |
X.jpg) |
| This is the virtually finished scenery at the transition. Fascia isn't painted yet. 072 | Here, the swallows nests are visible in the cracks between the stratas 074 |
X.jpg) |
X.jpg) |
| 150 | 096 |
X.jpg) |
X.jpg) |
| Guardrails have been installed on the short bridge. 151 | I used Peco code 83 American for the mainline and bulk code 75 for the guardrails. 152 |
X.jpg) |
X.jpg) |
| 154 | 155 |
X.jpg) |
X.jpg) |
| The finished diorama. Pencil traces on the backdrop mark the painted "horizon" I added later on. 220 | 221 |
X.jpg) |
X.jpg) |
| The rock formation at left is carved styrofoam, a technique I wanted to try. 241 | 242 |
X.jpg) |
X.jpg) |
| 244 | 712 |
added: 2/19
| Temporary placing the next diorama at the open grid stage. When I am sure it fits I put it on sawhorses, it's easier to work on it from all sides. | |
X.jpg) |
X.jpg) |
| 105 | 106 |
X.jpg) |
X.jpg) |
| With the fascia installed. 110 | Subroadbed with room for a future bridge. 113 |
X.jpg) |
X.jpg) |
| 115 | 119 |
X.jpg) |
X.jpg) |
| On this one I began a project to test my skills. I chose the widest part of the diorama which correspond with the corner of the room in order to build a road in " forced perspective ". This to give that feeling of wide open range typical of the american west. I knew it would be a great challenge. 121 |
There you see the beginning of the road full scale at
the fascia and slightly narrower at the future RR crossing. I gave a rollercoaster shape to the road to make it more interesting. You also see the bases of future " mesas " that will restrict the viewing angle to avoid destroying the wanted effect. 123 |
X.jpg) |
X.jpg) |
| 124 | carving styrofoam to create the mesas. 127 |
X.jpg) |
X.jpg) |
| 129 | 131 |
X.jpg) |
X.jpg) |
| 134 | 137 |
X.jpg) |
X.jpg) |
| 138 | A view from the rear looks terrible ! Isn't it ? 143 |
X.jpg) |
X.jpg) |
| A closer view of the carving work. 145 | The almost finished mesas temporary in place. I left them removable until I can hang the diorama at the wall. They will be easier to install afterwards. 165 |
X.jpg) |
C.jpg) |
| 167 | 169 |
X.jpg) |
X.jpg) |
| Carved styrofoam in the background, carved plaster in the foreground. 173 | The building was built years ago by Lucien who gave it to me. I added a lot of weathering plus an old car kit and some details. 179 |
X.jpg) |
X.jpg) |
| 182 | 183 |
X.jpg) |
X.jpg) |
| Building a bridge over a dry lake. 212 | The abutments are made out of plaster of Paris. 210 |
X.jpg) |
X.jpg) |
| After fixing the painted backdrop, the module is in place and the mesas added. 222 | Lots of details are still to come. I added a LED strip to the rear for future effects. 223 |
X.jpg) |
X.jpg) |
| Slowly taking shape. 225 | 227 |
X.jpg) |
X.jpg) |
| 233 | Still waiting for the "track layers". 238 |
X.jpg) |
X.jpg) |
| Completed scenery with the typical "tourist trap". 359 | The forced perspective: There is only 82 cm from the fascia to the sky backdrop. The van in the distance is N scale. I planned everything to have the top of the road slightly below my own eye level. 364 |
X.jpg) |
X.jpg) |
| Homemade ocotillos and blooming yuccas. 366 | Vestiges of the old narrow gauge trestle, first line to conquer the sierra. 368 |
X.jpg) |
X.jpg) |
| 371 | On the right my "attempt" to make smoke trees... 375 |
X.jpg) |
X.jpg) |
| 428 | a Santa Fe freight is passing the road crossing 426 |
X.jpg) |
X.jpg) |
| Blooming yucca between the cars. 377 | The "Tourist trap". 378 |
X.jpg) |
X.jpg) |
| Latest acquisition to attract the passing by tourists. 608 | 609 |
X.jpg) |
X.jpg) |
| This is the temporary end of the westbound scenery. 793 | 713 |
L.jpg) |
|
| Perfect illusion of an endless road striking toward the horizon. - 424 | |
| Special light effects (early morning or late evening or night) are getting a very realistic view. | |
X.jpg) |
X.jpg) |
| 400 | 401 |
X.jpg) |
X.jpg) |
| 402 | 403 |
X.jpg) |
X.jpg) |
| 405 | 406 |
X.jpg) |
X.jpg) |
| 404 | 415 |
X.jpg) |
X.jpg) |
| 420 | 423 |
X.jpg) |
X.jpg) |
| 411 | 419 |
X.jpg) |
X.jpg) |
| 795 | 797 |
X.jpg) |
X.jpg) |
| 799 | 800 |
added: 2/19
|
Part 5: East of Sullivan's Curve by Bernard Frontanau (France) - Part 5 BNSF DESERT AND SIERRA SUB |
| Here are photos of the second diorama East of my Sullivan's curve. Photos of the building steps showing how I handled the scenery transition to be " geologically realistic ". The grid is 2 x 4 cm, the track support is 18 mm plywood, and the fascia 10 mm plywood. |
| Below, you can see photos of the freelance scenery I built east of the curve. You'll notice the tunnel which is placed stragically between a curve and a countercurve, in order to be fully appreciated from the aisle. The portals are inspired by the ones which once stood at Alray (Cajon). |
X.jpg) |
|
| On this photo the end of the module closest to the camera will be the interface with the Sullivan's curve module. Notice the "stepped" frame to accomodate the 3 % downgrade to the right.. 279 | |
X.jpg) |
X.jpg) |
| Test fitting the module. 281 | 282 |
X.jpg) |
X.jpg) |
| 285 | 286 |
X.jpg) |
X.jpg) |
| 311 | 312 |
X.jpg) |
X.jpg) |
| Making molds for the tunnel portals. 314 | 316 |
X.jpg) |
X.jpg) |
| Plaster of Paris portals gently drying. 317 | Building the tunnel becomes a challenging puzzle. 318 |
X.jpg) |
X.jpg) |
| A piece of track is installed, ballasted and weathered before carrying on. 325 | 330 |
X.jpg) |
X.jpg) |
| 331 | 335 |
X.jpg) |
X.jpg) |
| 337 | The aisle side will be on the right. 342 |
X.jpg) |
X.jpg) |
| 343 | 348 |
X.jpg) |
X.jpg) |
| Future underpass for a dirt road. The metal culvert is made of aluminium cake container. 435 | 436 |
X.jpg) |
X.jpg) |
| 440 | 441 |
X.jpg) |
X.jpg) |
| 442 | 443 |
X.jpg) |
X.jpg) |
| 450 | Module installed, the interface is still visible in the distance. 454 |
X.jpg) |
X.jpg) |
| 458 | Another culvert with "homemade" retaining walls. I love that. 465 |
X.jpg) |
X.jpg) |
| Tunnel view from the aisle. Note the scenic curve-counter curve. 511 | 512 |
X.jpg) |
X.jpg) |
| 516 | 517 |
X.jpg) |
X.jpg) |
| 518 | 519 |
X.jpg) |
X.jpg) |
| 520 | 720 |
| 471 is the start of the next module. I used 3 mm isorel (masonite ?) for the fascia instead of the 10 mm plywood. | |
X.jpg) |
X.jpg) |
| 471 | 721 |
X.jpg) |
X.jpg) |
| This time I chose to put the styrofoam and cut holes to install the risers and screw them to the grid, . . . 475 |
. . . instead of filling the foam around the
subroadbed. Result: A WASTE OF STYROFOAM, so no more. 476 |
X.jpg) |
X.jpg) |
| 487 | 491 |
X.jpg) |
X.jpg) |
| 493 | 495 |
X.jpg) |
X.jpg) |
| 496 | 498 |
X.jpg) |
X.jpg) |
| 500 | 719 |
X.jpg) |
X.jpg) |
| 717 | 718 |
X.jpg) |
X.jpg) |
| 501 | 716 |
X.jpg) |
X.jpg) |
| 502 | 505 |
X.jpg) |
X.jpg) |
| 507 | 508 |
X.jpg) |
X.jpg) |
| 752 | 753 |
X.jpg) |
X.jpg) |
| 754 | 757 |
| This module marks the end of the eastbound scenery progression. In a not too far future I'll show you what's going on at the lower level, with, for example, a replica of the Santa Fe's "spider bridge" in New Mexico. Bernie. | |
added: 1/20
|
Part 6: Construction of Lower Level by Bernard
Frontanau (France) - Part 6 BNSF DESERT AND SIERRA SUB |
|
| In order to extend the layout into the second half of the room, I had to complete the lower level in the first half, so long I had easy access. Eventhough the two levels are not connected yet I had no other choice. The connection will occur in the second half of the room. Bernie | |
| I started with the biggest module to be placed below the Sullivan's curve diorama. It would have been impossible to put it in place later. Concerning scenery and track laying I had to forget working on sawhorses, so I had to be ready to challenge my back while bending over and under for hours... Painful. | |
X.jpg) |
X.jpg) |
| 523 - Here the frame is partially built . . . | . . . and ready to be hung to the wall. - 527 |
X.jpg) |
X.jpg) |
| West end of the module with room for a bridge over a dry riverbed. - 552 | Scenery on its way. - 557 |
X.jpg) |
X.jpg) |
| Bridge abudments are already in place - 561 | Bridge installed with a piece of track and guard rails. - 568 |
X.jpg) |
X.jpg) |
| some vegetation has been added as well - 569 | see text below - 574 |
| 574: This is the future site of a small desert settlement where trains will stop for crew changes, and where helpers will be added to westbounds for the climb to the top of the pass. The challenge is again to give the feeling of wide open desert landscape in a very limited space. | |
X.jpg) |
X.jpg) |
| Forced perspective is used with ground cover and bushes decreasing in size toward the backdrop. - 582 | West end taking shape. - 588 |
X.jpg) |
X.jpg) |
| 727 | 729 |
X.jpg) |
X.jpg) |
| landscaping completed - 747 | The east end under construction. - 759 |
X.jpg) |
X.jpg) |
| A turnout complex is taking shape, the plywood board to the left will support a local highway. - 762 | West end of the three tracks, two number 8 turnouts have been installed. This is the beginning of single track territory for westbound trains. - 764 |
X.jpg) |
X.jpg) |
| East side taking shape. - 768 | 769 |
X.jpg) |
X.jpg) |
| 775 | The local diner ready for, among others, truckers and train crews. - 782 |
X.jpg) |
X.jpg) |
| There is room by the stop sign for the local water tank - 783 | Test fitting the different buildings. - 791 |
| Below: Scratchbuilding an old adobe style building. Inspiration came from an article and photos of a real place in a model railroad magazine. | |
X.jpg) |
X.jpg) |
| 801 | 802 |
X.jpg) |
X.jpg) |
| An area fully completed. - 810 | An area fully completed. - 811 |
X.jpg) |
X.jpg) |
| 815 | 822 |
| Below: The now finished adobe building. For many years it was home of the local "cantina" and city hall office. There was also room to park a fire truck. Now abandoned it was saved by the inhabitants who did'nt want the heritage of a mexican past to be destroyed. The local streets and highway are a mix of asphalt and concrete slabs. | |
X.jpg) |
X.jpg) |
| The now finished adobe building. - 831 | Behind the tracks lays the endless desert... - 832 |
X.jpg) |
X.jpg) |
| 835 | 837 |
X.jpg) |
X.jpg) |
| very realistic scene - 838 | Empty spaces between the different buildings contribute to the illusion of wide open western scenery. - 839 |
X.jpg) |
X.jpg) |
| 840 | 841 |
| The three tractor trucks and the pick-ups have been modified and detailed by Lucien Wiss who, kindly, gave them to me. | |
| Below: Extending west this is the frame for the next module that will show off a famous ATSF scenic landmark in New Mexico: the "Spider Bridge". | |
X.jpg) |
X.jpg) |
| New site of the "Spider Bridge" - 556 | Test fitting the module. - 578 |
X.jpg) |
X.jpg) |
| The "spider bridge" under construction. - 580 | The "spider bridge" under construction. - 583 |
X.jpg) |
X.jpg) |
| a unique construction - 585 | Future abutments (scribed styrofoam). - 590 |
X.jpg) |
X.jpg) |
| Building the terrain. - 596 | 601 |
| The real bridge is located in Apache Canyon, New Mexico and spans Galisteo Creek. I paid attention to respect the bridge look and placement and also the path and configuration of the creek beneath it. The surrounding landscape is made of some kind of loose rocks and stones. Instead I chose to represent terraced hills. | |
X.jpg) |
X.jpg) |
| 603 | 606 |
X.jpg) |
X.jpg) |
| 611 | 613 |
X.jpg) |
X.jpg) |
| 615 | 617 |
X.jpg) |
X.jpg) |
| 623 | 630 |
| Aerial view of the completed module, since there is no guard rails on the prototype I did'nt put any on the model. On my layout west is always to the left, since I wanted the bridge to be on the aisle side, the placement and configuration are correct, but on the prototype East is to the left. | |
X.jpg) |
X.jpg) |
| 631 | 860 |
X.jpg) |
X.jpg) |
| one foot (post) is much longer - 864 | the other one is just mounted on the rock - 866 |
| Continuing west I wanted trains to gain altitude while climbing on a narrow rock shelf nestled against a canyon wall and hung over a deep chasm. The scenery will expand all the way down to the floor. Train crews will hold their breath while negociating the trackage at restricted speed ...Vertigo forbidden ! | |
X.jpg) |
X.jpg) |
|
Temporary placing the track support to check the
height. 633 |
Track support attached to the wall and fascia
installed. 635 |
X.jpg) |
X.jpg) |
| I managed to leave enough room in between for a chair so I could first complete the scenery behind the track, and then, carry on toward the aisle. - 637 | Additional supports added. - 643 |
X.jpg) |
X.jpg) |
| Additional supports added. - 644 | Adding styrofoam slabs. - 646 |
X.jpg) |
X.jpg) |
| Plaster work starting at the transition with the previous module. - 648 | Working on the "rock wall" behind the track. - 649 |
X.jpg) |
X.jpg) |
| Plaster added and carved. - 656 | Progressing west. It is obvious that the backdrop was installed too low, I managed to place, later on, a second one in front of it. It is visible on future photos. - 657 |
X.jpg) |
X.jpg) |
| Working on a future rock shed. - 659 | It is already painted and weathered. - 662 |
X.jpg) |
X.jpg) |
| A piece of ballasted and weathered track waiting for the rock shed. - 664 | Rock shed at home (mounted). - 667 |
X.jpg) |
X.jpg) |
| Scenery behind the track well on its way. - 668 | Scenery behind the track well on its way. - 670 |
X.jpg) |
X.jpg) |
| A rock formation with its "balancing rock" is definitively installed on its wood support. - 672 | With the track ballasted, I started building further toward the aisle. - 682 |
X.jpg) |
X.jpg) |
| The scenery is going down to the floor. - 684 | The completed canyon, I still have to add some sparse vegetation. At the rock shed the track is 102 cm above the floor. - 690 |
X.jpg) |
X.jpg) |
| A lone ATSF geep helps to visualize the size of the cliff. The now higher backdrop is visible. - 694 | Closer view of the Santa Fe Diesel Loco - 695 |
X.jpg) |
X.jpg) |
| Getting closer to the short tunnel. - 701 | realistic rock formations - 703 |
X.jpg) |
X.jpg) |
| - 698 | - 699 |
X.jpg) |
X.jpg) |
| A railfan's dream: a fantastic view point to watch trains climbing along the canyon walls. - 705 | In the meantime, some landscaping has been added - 738 |
X.jpg) |
X.jpg) |
| - 936 | - 937 |
X.jpg) |
X.jpg) |
| This is the temporary west end of the lower level. - 926 | Moving back to the east end. Pretty soon this area will find idling helpers waiting to help heavy westbounds. - 842 |
X.jpg) |
X.jpg) |
| Wooden frame ready for expansion east. - 845A | Wooden frame ready for expansion east. - 845B |
X.jpg) |
X.jpg) |
| Track support ready (cork roadbed). - 850 | Here is where westbounds will appear and eastbounds will disappear. - 851 |
X.jpg) |
X.jpg) |
| A close-up view of the now installed turnouts with switch stands. - 872 | All mainline turnouts are equiped with "cosmetic" electric motors. Others receive "manual" high target switch stands, or low target like the turnout leading to the spur in the distance. - 875 |
X.jpg) |
X.jpg) |
| Dealing with desert scenery, I realized that the only answer to hide the eastern end of the layout, was to build an overpass. - 887 | Cork roadbed is ready for track laying - 889 |
X.jpg) |
X.jpg) |
| More crossovers have to be installed. The turnout on the left will lead to another spur. - 892 | Some sparse vegetation will be added. Curved turnouts are no. 7, others are no. 8 and 6. No. 6 is my minimum. - 893 |
X.jpg) |
X.jpg) |
| The turnouts configuration allows trains access to and from any of the three tracks. - 938 | The turnouts configuration allows trains access to and from any of the three tracks. - 939 |
X.jpg) |
X.jpg) |
| A panoramic view of the small desert settlement. - 928 | A panoramic view of the small desert settlement. - 929 |
X.jpg) |
X.jpg) |
| Details with siding and 2 of the 3 tracks going under the overpass as seen on the next photo. - 933 | An aerial view of the eastern limit of the scenicked part of the layout. Two tracks will lead to a couple of return loops. One track will connect to a helix for continuous run. - 935 |
| Below: An eastbound with full dynamic braking is gliding down the 3% grade above the deep chasm. | |
X.jpg) |
X.jpg) |
| - 940 | - 941 |
X.jpg) |
X.jpg) |
| The train is about to cross Spider Bridge. - 942 |
An eastbound freight has just stopped for a crew
change. - 927 |
added: 6/21
|
Part 7: Extending the upper level to the west by Bernard
Frontanau (France) BNSF DESERT AND SIERRA SUB |
|
|
This extension starts at the location seen in Part 4
photo 793. Sticking with the 3% grade, the track will enter the 2nd half of the room by way of a tunnel, then will make a big loop in the room center in order to gain enough altitude to reach, first, the geographical summit, then, slightly lower, the railroad summit where helpers will be cut off from the trains. The tunnel and a double sided backdrop will divide two different type of scenery. But what will be beyond the tunnel will be a future subject for a part 8. - Bernie |
|
| I started | |
X.jpg) |
X.jpg) |
| 911 - Here is the very beginning, the wooden . . . | . . . frames are still at the workbench. - 912 |
X.jpg) |
X.jpg) |
| 967 - | 969 - |
| As you notice in the background a partially built portion of the future part of the layout is installed. The reason was to make sure the track height above the floor would be correct, and all the different grades would match my original planning. | |
X.jpg) |
X.jpg) |
| 974 - The view from below shows the location of a future "duck under" or maybe "nod under", it all depends how tall you are ... | 975 - Clearance is 155 cm. This passage will connect both halves of the room. |
X.jpg) |
X.jpg) |
| 976 - no scenery existing yet. | 981 - Scenery is well on its way, track isn't installed yet. |
X.jpg) |
X.jpg) |
| 985 Installing track. I should never have put some scenery | before laying track, it just made things harder, oh well.. 987 |
X.jpg) |
X.jpg) |
| 988 - Future location of the east portal. The big saguaro was made many years ago by my friend Lucien Wiss and was part of his legacy. | 989 - Future area for the west portal. |
X.jpg) |
X.jpg) |
| 990 - wooden frame waiting for west portal and scenery | 991 - Scenery completed on the east side |
X.jpg) |
X.jpg) |
| 1008 - East portal completed. | 1108 - East portal completed. |
X.jpg) |
X.jpg) |
| 1107 - East side overview. | 1012 - Building the west side. |
X.jpg) |
X.jpg) |
| 1013 - West side of the backdrop taking shape. | 1014 - West side of the backdrop taking shape. |
X.jpg) |
X.jpg) |
| 1016 - West portal almost finished | 1019 - West portal with retaining wall |
X.jpg) |
X.jpg) |
| 1020 - Tunnel portal was mounted | 1103 - West portal is finished |
|
The photo 1103 shows the west portal and its
surrounding completed. The westbound trains popping out of the tunnel will
encounter a very different scenery typical of higher altitudes, conifers,
aspens, and other trees are the rule. I chose to model fall colors for their
visual impact, especially the golden aspens. The trains will struggle the 3%
grade, negotiating a big turnback loop in the middle of the room to gain
altitude and reach, first, the geographical summit, and then, slightly lower,
the railroad summit where helpers will be cut off from their trains. Out of
the tunnel trains will seem to run in the wrong direction, then negotiate
the big loop and pass over the west portal before reaching the railroad
summit. But this is another story. |
|
X.jpg) |
X.jpg) |
| 1104 - Scenery around the west portal. | 1026 - Scenery near the west portal. |
added: 1/22
|
Part 8: Extending west to the summit and beyond by
B. Frontanau (France) BNSF DESERT AND SIERRA SUB |
|
| Before all, I added some bracing to the west portal seen in Part 7, and slightly moved the support post away from the tracks as a safety measure, despite the very wide radius (compare the two photos, before and after). - Bernie | |
X.jpg) |
X.jpg) |
| 1030 | 1125 |
X.jpg) |
X.jpg) |
| 907 - Testing the position of the first part frame. | 909 |
X.jpg) |
X.jpg) |
| 913 - Building up the terrain with styrofoam. | 914 - Building up the terrain with styrofoam. |
X.jpg) |
X.jpg) |
| 915 - Landscape is taking shape. | 949 - West end of first portion almost fully scenicked. |
| Notice that the entry door is visible to the left. With a clearance of 169 cm it will be an easy "nod under". | |
X.jpg) |
X.jpg) |
| 959 - This is the next portion, the thinner end . . . | . . . to the right will span the entry door. - 960 |
X.jpg) |
X.jpg) |
| 999 | 1003 - shows the installation above the entry door. |
X.jpg) |
X.jpg) |
| 1007 - Building the next part. | 1011 - Tunouts (switches) have been mounted. |
X.jpg) |
X.jpg) |
| 1031 - Looking toward the east, a big part of the summit trackage complex is visible. | 1032 - Gone are the old buildings, snowsheds, turntable and so on which were the rule in the steam days. |
| An old inspection car shed, now used as a tool and equipment shed, still stands amid old foundations and concrete slabs. | |
X.jpg) |
X.jpg) |
| 1035 - Views of the summit area. | 1037 - Views of the summit area. |
X.jpg) |
X.jpg) |
| 1038 - More views of the summit area. | 1039 - More views of the summit area. |
X.jpg) |
X.jpg) |
| 1040 - Extending west. | 1042 - Extending west. |
X.jpg) |
X.jpg) |
| 1043 - This is the western end of the layout. West summit is where westbounds trains will quit the scene . . . | . . . and where eastbounds will appear. - 1044 |
X.jpg) |
X.jpg) |
| 1045 - Scenery well on its way. | 1046 - Closeup of trees before and on top of the rock. |
X.jpg) |
X.jpg) |
| 1101 - Building the west "exit". | 1102 - Again, I am using styrofoam. |
X.jpg) |
X.jpg) |
| 1110 - Plaster was used to form the rocks. | 1115 |
|
Adding "concrete" snowsheds, inspired by those found
at famous Donner Pass in the Sierra Nevada. The back track will lead to a return loop. The left leg of the turnout will be the other end of the return loop. The right leg will connect to a helix for continuous run. |
|
X.jpg) |
X.jpg) |
| 1117 - The completed snowsheds. | 1118 - The completed snowsheds. |
X.jpg) |
X.jpg) |
| 1121 - More viewing angles (from above). | 1122 - More viewing angles (from below). |
X.jpg) |
X.jpg) |
| 1198 - West summit scenically completed. | 1199 - West summit scenically completed. |
X.jpg) |
X.jpg) |
| 1200 - More of west summit. | 1201 |
X.jpg) |
X.jpg) |
| 1202 | 1203 - last photo of Part 8. |
|
This upper level extension will be extended to the
east to connect with the tunnel shown at the beginning of this part 8. It will be by way of a big loop in the middle of the room. For now I will concentrate on the helix building and on the upper return loop. Then there will be more extensions to come, but that's another story. Bernie. |
|
added: 4/22
|
Part 9:
is
about the helix and the upper return loop by
B. Frontanau (France) BNSF DESERT AND SIERRA SUB |
|
|
The helix: - radius 84 cm - grade 2,2 % - rail top to
rail top 11,6 cm - track length about 30,50 meters. Upper return loop: Usable length: 7,65 meters. I built the helix to provide continuous run for unit trains, but, above all, those pulling open cars. Loads going always in the same direction, and empties the other way. I also installed an upper return loop allowing, for example, westbound Amtrak to reappear later on as an eastbound. Helix and return loop are built using 12 mm thick plywood connected with 10 mm pieces. The 12 mm is used in place of the 18 mm I normally use on the visible part of the layout. Also track is laid directly on the plywood without the cork layer. These two factors save 10 mm between each helix lap. There is 9,9 cm between top of rail and bottom of the overhead board, but only 8,9 cm where a 10 mm connecting piece is placed. There is a total of 5 and 3/4 laps. I had to cut 44 pieces assembled 2 by 2 plus 2 transitions, one for each end of the helix. I found out I had to add to each lap a short 16 cm piece in order to get the exact diameter, (yes my mistake...). |
|
X.jpg) |
X.jpg) |
| 1123 - Some of the ready pieces connected with 10 mm thick plywood, at right is the transition for the helix lower access. | 1124 - Testing on the floor the helix placement according to my plan. |
X.jpg) |
X.jpg) |
| 1126 - The completed frame, here upside down, it will support the helix. | 1128 - The frame is in place. The piece of track support seen in the background had to be installed now, more on this in future Part 10. |
X.jpg) |
X.jpg) |
| 1129 - A different view angle. | 1144 - Lower access and first lap completed. |
X.jpg) |
X.jpg) |
|
1152 - Here, at the
very top, a part of the upper return loop is visible, with, to the right, a
temporary support. The helix is well on its way. |
1183 - The now completed helix. The low blue fascia hides the return loop. To the right of it, partially hidden by a low white safety barrier, is the upper access to the helix. |
X.jpg) |
X.jpg) |
| 1217 - 1218: Inside the helix. I had a good price on some track with "concrete" ties, I didn't care mixing both types since the area will be hidden. | |
added: 4/22
|
Part 10: Extending the Upper Level to the EAST by
B. Frontanau (France) BNSF DESERT AND SIERRA SUB |
|
| This extension starts where Part 5 ended. | |
X.jpg) |
X.jpg) |
| 1132 - First frame is installed with a short trestle bridge. Just underneath is the piece of roadbed already seen in Part 9 photo 1128. The helix wasn't built yet at the time. | 1133 - View from a different angle, the upper part will make a very big loop, partially hidden, and will connect with the part below it. Grade will be 3%. |
X.jpg) |
X.jpg) |
| 1135 - Closer view of the trestle. | 1136 - A part of the future backdrop is installed, and so is the fascia. |
X.jpg) |
X.jpg) |
| 1138 - Working on a rock formation. | 1139 - Scenery is progressing and the fascia is painted. |
X.jpg) |
X.jpg) |
| 1143 - The start of the new part is located where the cactus stands. | 1141 - A wider view of the area. |
X.jpg) |
X.jpg) |
| 1154 - Details close-up. | 1146 - Scenery virtually completed. |
X.jpg) |
X.jpg) |
| 1149 - Scenery completed. | 1151 - Looking west. Backdrop is now installed. |
X.jpg) |
X.jpg) |
| 1155 - Styrofoam stage, the tunnel portal is installed. Underneath a portion of the future hidden access to the two lower return loops and to the helix is visible. | 1156 - A different angle. |
X.jpg) |
X.jpg) |
| 1157 - Portion of finished scenery just east of the trestle. | 1159 - More completed scenery. |
X.jpg) |
X.jpg) |
| 1172 - Eastbound warbonnet 226 crossing the trestle. | 1216 - Scenery completed around the east portal. |
X.jpg) |
X.jpg) |
| 1244 - Progressing east, below is the east portal for the big loop. | 1245 - Farther east. I ballasted only in between the rails and the inside of the curve. The outside will wait until completion of the scenery. |
X.jpg) |
X.jpg) |
| 1246 - Progressing east. | 1250 - Scenery details. |
X.jpg) |
X.jpg) |
| 1247 - Still moving east. | 1248 - Rock formations just before the big loop west portal. |
X.jpg) |
X.jpg) |
| 1180 - Same area, wider angle. | 1181 - The west portal. |
X.jpg) |
X.jpg) |
| 1249 - A closer view. | 1257 - Back to the east portal. |
X.jpg) |
X.jpg) |
|
1258 -
1259: Scenery will extend down from upper
to lower tracks. So I will face a big scenery building challenge, what a thrill ! |
|
Continued
on the Second
Section: Part 11 to Part 18 - click here
all photos copyright by Bernard
Frontanau, France
| More photos of the BNSF DESERT AND SIERRA SUB will be shown in the future - just check back ! |
go back to the Diorama main page - click here / go back to the Layout main page - click here
over all copyright by Werner Meer,
Switzerland - 2025
.jpg)
.jpg)
.jpg)
.jpg)
.jpg)
.jpg)
.jpg)
.jpg)
.jpg)
.jpg)
.jpg)
.jpg)
.jpg)
.jpg)
.jpg)
.jpg)
.jpg)
.jpg)
.jpg)
.jpg)
.jpg)
.jpg)
.jpg)
.jpg)
.jpg)
.jpg)
.jpg)
.jpg)
.jpg)
.jpg)
.jpg)
.jpg)
.jpg)
.jpg)
.jpg)
.jpg)
.jpg)
.jpg)
.jpg)
.jpg)
.jpg)
.jpg)
.jpg)
.jpg)
.jpg)
.jpg)
.jpg)
.jpg)
.jpg)
.jpg)
.jpg)
.jpg)
.jpg)
.jpg)
.jpg)
.jpg)
.jpg)
.jpg)
.jpg)
.jpg)
.jpg)
.jpg)
.jpg)
.jpg)
.jpg)
.jpg)
.jpg)
.jpg)
.jpg)
.jpg)
.jpg)
.jpg)
.jpg)
.jpg)
.jpg)
.jpg)
.jpg)
.jpg)
.jpg)
.jpg)
.jpg)
.jpg)
.jpg)
.jpg)
.jpg)
.jpg)
.jpg)
.jpg)
.jpg)
.jpg)
.jpg)
.jpg)
.jpg)
.jpg)
.jpg)
.jpg)
.jpg)
.jpg)
.jpg)
.jpg)
.jpg)
.jpg)
.jpg)
.jpg)
.jpg)
.jpg)
.jpg)
.jpg)
.jpg)
.jpg)
.jpg)
.jpg)
.jpg)
.jpg)
.jpg)
.jpg)
.jpg)
.jpg)
.jpg)
.jpg)
.jpg)
.jpg)
.jpg)
.jpg)
.jpg)
.jpg)
.jpg)
.jpg)
.jpg)
.jpg)
.jpg)
.jpg)
.jpg)
.jpg)
.jpg)
.jpg)
.jpg)
.jpg)
.jpg)
.jpg)
.jpg)
.jpg)
.jpg)
.jpg)
.jpg)
.jpg)
.jpg)
.jpg)
.jpg)
.jpg)
.jpg)
.jpg)
.jpg)
.jpg)
.jpg)
.jpg)
.jpg)
.jpg)
.jpg)
.jpg)
.jpg)
.jpg)
.jpg)
.jpg)
.jpg)
.jpg)
.jpg)
.jpg)
.jpg)
.jpg)
.jpg)
.jpg)
.jpg)
.jpg)
.jpg)
.jpg)
.jpg)
.jpg)
.jpg)
.jpg)
.jpg)
.jpg)
.jpg)
.jpg)
.jpg)
.jpg)
.jpg)
.jpg)
.jpg)
.jpg)
.jpg)
.jpg)
.jpg)
.jpg)
.jpg)
.jpg)
.jpg)
.jpg)
.jpg)
.jpg)
.jpg)
.jpg)
.jpg)
.jpg)
.jpg)
.jpg)
.jpg)
.jpg)
.jpg)
.jpg)
.jpg)
.jpg)
.jpg)
.jpg)
.jpg)
.jpg)
.jpg)
.jpg)
.jpg)
.jpg)
.jpg)
.jpg)
.jpg)
.jpg)
.jpg)
.jpg)
.jpg)
.jpg)
.jpg)
.jpg)
.jpg)
.jpg)
.jpg)
.jpg)
.jpg)
.jpg)
.jpg)
.jpg)
.jpg)
.jpg)
.jpg)
.jpg)
.jpg)
.jpg)
.jpg)
.jpg)
.jpg)
.jpg)
.jpg)
.jpg)
.jpg)
.jpg)
.jpg)
.jpg)
.jpg)
.jpg)
.jpg)
.jpg)
.jpg)
.jpg)
.jpg)
.jpg)
.jpg)
.jpg)
.jpg)
.jpg)
.jpg)
.jpg)
.jpg)
.jpg)
.jpg)
.jpg)
.jpg)
.jpg)
.jpg)
.jpg)
.jpg)
.jpg)
.jpg)
.jpg)
.JPG)
.JPG)
.JPG)
.JPG)
.JPG)
.JPG)
.JPG)
.JPG)
.JPG)
.JPG)
.JPG)
.JPG)
.JPG)
.JPG)
.jpg)
.jpg)
.JPG)
.JPG)
.jpg)
.jpg)
.jpg)
.jpg)
.jpg)
.JPG)
.JPG)
.JPG)
.jpg)
.jpg)
.JPG)
.JPG)
.JPG)
.JPG)
.JPG)
.jpg)
.JPG)
.JPG)
.JPG)
.JPG)
.JPG)
.JPG)
.jpg)
.jpg)
.jpg)
.jpg)
.jpg)
.jpg)
.jpg)
.jpg)
.jpg)
.jpg)
.jpg)
.jpg)
.jpg)
.jpg)
.jpg)
.jpg)
.jpg)
.jpg)
.jpg)
.jpg)
.jpg)
.jpg)
.jpg)
.jpg)
.jpg)
.jpg)
.jpg)
.jpg)
.jpg)
.jpg)
.jpg)
.jpg)
.jpg)
.jpg)
.jpg)
.jpg)
.jpg)
.jpg)
.jpg)
.jpg)